Infrared Photography - Part 1
For many of you old camera wizards, the information in these Learning Center articles is not relevant or new to you. Don't hate me.
New people come here every day, some are keen on expanding their craft and branching off into different areas. This is what we hope to write about. Feel free to drop us ideas on what you'd like to see written up too, we are all ears and love to reject people's ideas summarily ;) (Just kidding - maybe)
This subject is one I know about, so here we are. For a lot of people, they see infrared photos and go .. wow that's so cool how do I do that? If that's you, well this article series is for you.
Infrared Photography for Beginners
One of my photographic passions is infrared photography.
This article series will dive into infrared photography, discuss various filters, and get into various techniques and tips I have learned over the years. It will also talk about some of the gear I use personally and what I have found works for me. Several great companies deal with infrared modification and supplies, but I have primarily used Kolari Vision for the last 15 years. So I’ll be mentioning them from time to time in this article. I have also used LifePixel as well and found them to be a great company to deal with, with top-notch support and service. You can’t go wrong dealing with either company.
This first article is an overview - I have no idea how many articles there will be in the series. The next one will be more of a review on an economical way to start your infrared journey.
What is an Infrared Photograph
Infrared photographs take images that contain just a portion of the visible and near-visible light spectrum.
If we look at the light spectrum, as the wavelength increases, it moves more into the red and finally into infrared. Your camera CMOS sensor is quite sensitive to infrared light, so it is uniquely capable of capturing visible and near-infrared light well into the infrared spectrum (around 1000nm).
What makes infrared photos stand out is what elements in nature absorb infrared energy, and what elements reflect it. Elements such as leaves and green grass reflect the energy (because of chlorophyll), while water absorbs it.
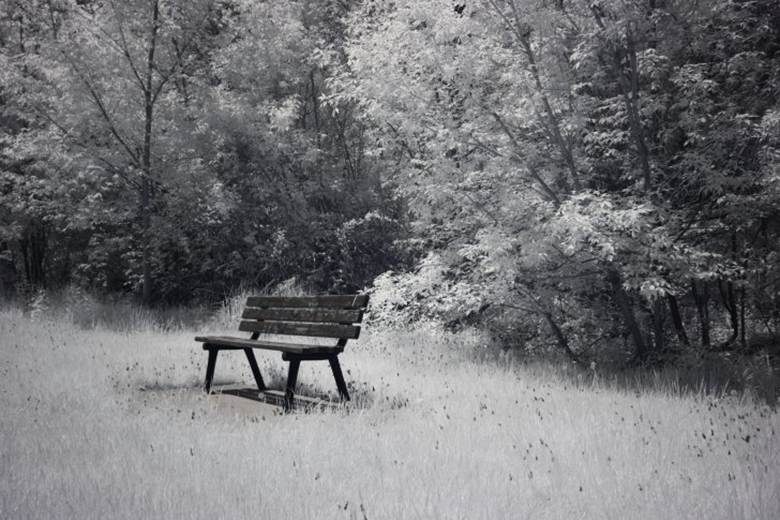
In the above image, this is an unremarkable park bench, but the green grass and tree foliage are all turned to tones of grey (after post-processing).
Surprisingly, the healthier the plant, the more it will reflect light. You can determine a plant's health by how it looks in infrared.
The nature of capturing this with the difference in what absorbs infrared energy and what reflects it means that your photos will look best when the sun is at its peak output - so around noon on a sunny day. As the sun gets more obscured, the image will look muddier as the light is bounced and scattered, and there is simply less energy for the camera to capture.
Why Infrared Photography
Well, simply put – everyone can take color photographs these days, but not everyone can take infrared (IR) photographs. There are over a billion cameras out there in the world, but hardly any of them can take anything but color photographs natively. There was the OnePlus 8 Pro that had an infrared sensor, but after a bunch of people wrote about it seeing through wet clothing, OnePlus disabled it. Infrared isn't suitable for the masses it seems.
Several advantages to infrared photography keep me motivated to have an infrared camera close by;
- The time to take infrared photos is different than the time to take color photos. For color photography, the best times are during the golden hours of morning and evening. For infrared the best times are during the day when the sun is at its brightest. It means you can essentially take photos at any time of the day using a combination of color and infrared photography, at their optimum times of the day. You can start off taking color images in the morning, switch to infrared, and then back to color for a full day of optimal landscape photography.
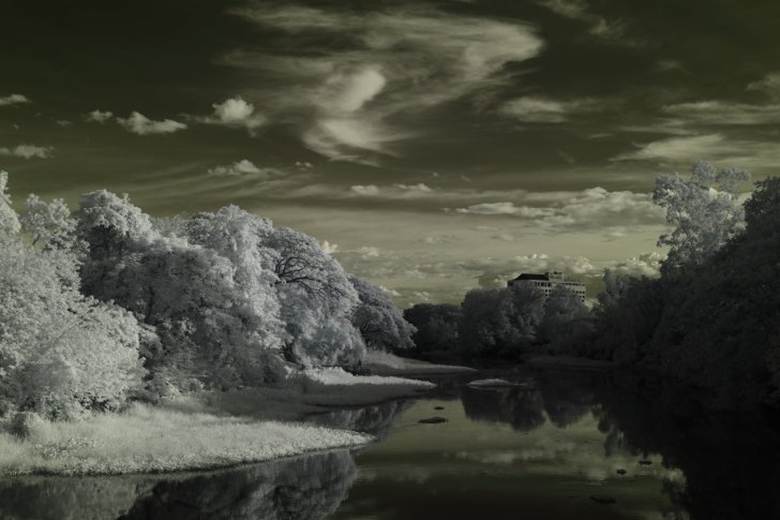
- Water Pollution. One thing that always troubled me was polluted water with color photography. No one wants to see a brown or green river in their photo unless that is what you are documenting. However, infrared light gets absorbed by water and does not reflect it, so any water, will turn completely dark. So even the ickiest looking river, looks majestic in infrared.
- It's more unique. While infrared photography has exploded where it's not that unique anymore, most people take images with their smartphones - the vast majority of them are simply color or black and white, while they may be able to simulate IR, they'll never be able to take an IR photo directly. In a world that is dominated by smartphone photos, there's still an ongoing uniqueness to infrared photos.
Your Camera and Infrared Photography
I have moved from the Canon EOS 20D through multiple DSLRs to my current infrared camera, the EOS-M M6 Mark II. Each of these cameras was modified by companies to shoot infrared. I never did the conversion myself - I was never that brave to do so.
Why modified you ask? Because primarily sensitivity to infrared light. Normally a camera will have at least one filter sitting in front of the camera sensor. These are usually called the IR blocking filter, IR cut filter, or hot mirror filter. They all mean the same. These filters are there in your camera to block UV and IR light from passing through the sensor. CMOS sensors are by default overly sensitive to IR light, so if too much gets to the sensor, it can dramatically affect normal color photography.
So with the hot mirror filters in front of the sensor, a normal camera isn’t as sensitive as it could be to wavelengths over 600nm. Here is the spectral response of many cameras from various brands. You can see that they all more or less follow the same spectral response with a nearly full cutoff at the frequencies of light that we are interested in which is around 720nm and above.
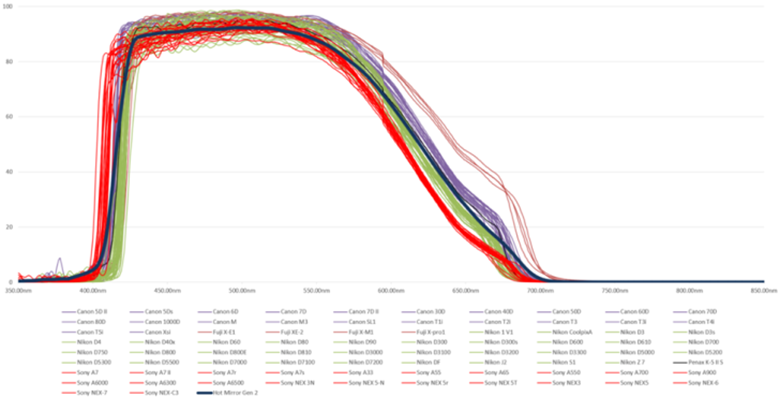
When the most popular wavelength for infrared photography is 720nm and I enjoy 950nm as well, you can see that a normal camera filters too much of that light to be useful. Your ISO has to be dramatically increased and shutter speed becomes so long without an adapted camera that it becomes very difficult to take quality images. The image quality is poor at best and that’s being generous.
This leads us to camera conversions, making your camera able to take better photos in the infrared spectrum.
Camera Conversion
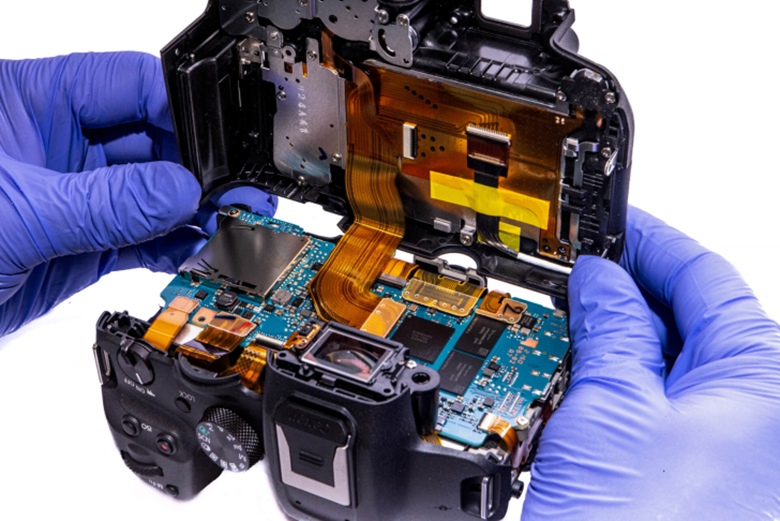
Cameras are converted to shoot better infrared by taking the sensor apart. This means that the camera is completely disassembled in a clean room, down to the sensor assembly, and the IR Cut filter(s) are removed. The company doing the conversion then installs your filter of choice or clear glass where the camera’s IR cut filter was and then assembles the entire camera back up again.
This is depending on the camera, quite an involved process.
There are different types of filter conversion you can get done to your camera which is the company installs a different filter (or none at all) where the cut filter is. I group these different filters into two broad categories. Narrow bandpass or a full/dual broad spectrum.
Choosing a Specific Sensor Filter
There are a multitude of different filters you can put on your camera's sensor during the conversion. Here are some examples from the common filters.
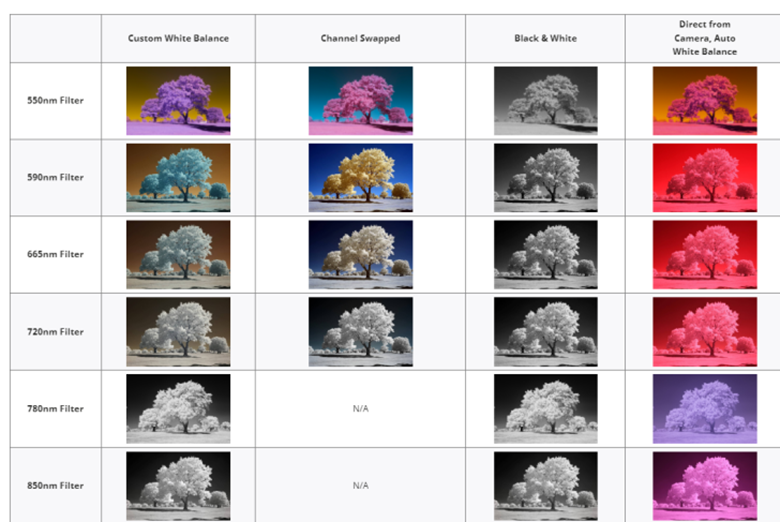
Briefly, the first column is how the image looks when you have a custom white balance selected on your camera and you are taking photos, the second column is when you do something called "channel swapping" in post-processing, and the third column is how the image looks in black and white. You rarely see a difference in black and white until you get around 800+ nanometers, but your mileage may vary.
If I get a camera converted to a 580nm spectrum camera. I can then natively take pictures at 580nm, then I can put a 720nm filter in front of the camera to take an image at 720nm. You can create images by adding a filter in front of the camera (either in the mount housing or as a filter in front of the lens. However, that is useful in one direction only. For instance, you can't get your camera converted to 720nm, put on a 580nm filter, and expect to take a picture that appears like a 580nm converted camera.
The convenience is that at the wavelength you selected your camera to be converted for you don’t require any additional filter. If you go this route there are several factors you should consider;
- what is the lowest wavelength you want to take photos at
- what wavelength are you most commonly going to take photos at
- is using an additional filter something you feel is disruptive to your photography
If you feel that most of your photos would be at 720nm (the most common wavelength) and that wavelengths under 720 such as 550 and 590nm don't interest you that much, then the 720nm conversion would be most suitable for you. In this case, you won't need any filters at all to take your 720nm infrared photos. For the longest of times, I always got my cameras converted to 720nm for this very reason.
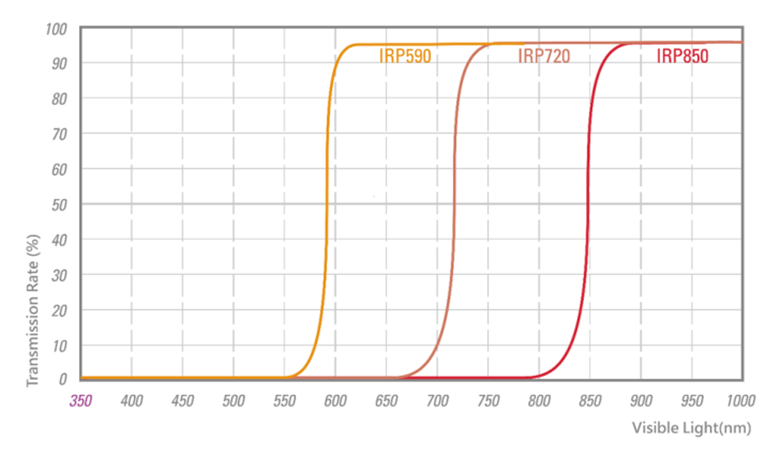
Looking at the above graph, you can see that a 590 filter allows all wavelengths greater than 590, and so on. Since it’s not a narrow band filter above its own, you can subsequently use filters that have wavelengths above it. The downside to doing this narrow spectrum is that you cannot use your camera for any color photography. It’s completely converted to only take infrared pictures.
There is another conversion that you can get your camera converted to and that is full spectrum. Full spectrum can also be subdivided into full and dual spectrum. These two filter categories allow for nearly all wavelengths, meaning that you can use your camera for both color and infrared photography depending on the filter you use in front of your camera. We fully recommend that if you are serious about infrared, your best solution is always either a full spectrum or a two-spectrum converted camera.
What’s the difference between full and dual Spectrum?
The full spectrum allows UV, color, and IR light to hit the sensor. The two-spectrum filter allows only visible and IR light and has a UV cut filter installed. If you never plan on shooting UV, then doing the dual-spectrum conversion is a logical option. The dual spectrum conversion gives you the most accurate color imagery, because the combination of the UV cut filter that exists on the sensor and adding a hot mirror filter, gives you a response almost identical to that of a stock cut filter if you had never removed it from your camera.
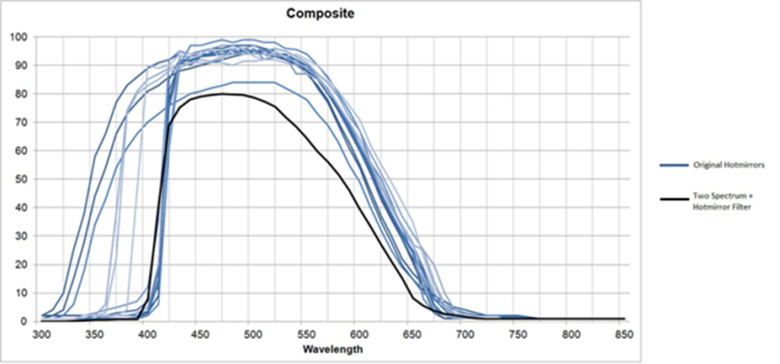
Meanwhile, in full spectrum, the filter is simply a piece of optical glass, that allows all possible light to reach your sensor and you are responsible for choosing a filter that allows you to choose what spectrum of light you wish to record.
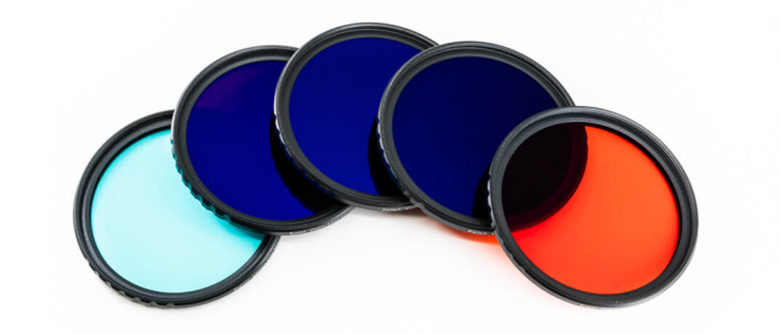
When you choose to convert your camera to full or dual spectrum, it allows you to use the widest available selection of filters, giving you the maximum creativity. Of course, the cost is that you need additional filters, and you have to put a filter in front of your camera or lens. A good set of filters can go a long way. I fully recommend getting a good filter set that is to your largest filter size and using step-up rings for lenses with smaller diameters. These filter sets can be very expensive. Step-up rings are cheap but filter sets are not, especially when you are first starting out and unsure about what wavelengths you enjoy taking photos at.
This ends our first article, stay tuned for more!
27